Disclaimer: I AM NOT A PERFECTIONIST! My lines are not perfect and that's okay with me. It will be worn a few times and then be outgrown. I'm about simple and getting it done fast. If I were a perfectionist, I would get nothing done because I can't do anything perfectly!
Note: DO NOT COPY this tutorial without permission.
 (I made this for my niece, but she was unavailable for modeling, so my son dawned the crown for just one shot!)
Supplies: thread, felt, pipe cleaners, head band, craft glue, green t-shirt, scissors, sewing machine, green felt and pink felt, (added later: wire cutters)

I made my own petal pattern piece and a leaf to use. I folded the pink felt sheets into thirds and cut out three petals at a time. For the green, I had a huge sheet of felt and folded it into fourths to cut. I ended up with 24 petals and 10 leaves. I only used 19 petals in the end.

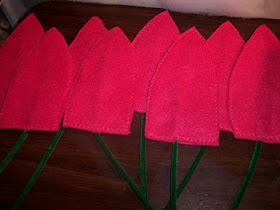
Put a line of glue vertically down the center of one petal, lay the pipe cleaner onto glue. I added a little glue down the pipe cleaner and put a second petal on top of that.

Eight petals done! Once the glue set some, I zig-zag stitched around the edges of each petal. I was surprised to see that my needle went right over the pipe cleaners, no problem, just go slow!

Lay out the petals so that they look nice on the headband. I did four in front and four in back. Then I wound the pipe cleaners, one at a time, around the head band. Use wire cutters to trim the extra pipe cleaner.

I wrapped around twice and made sure that the end of the pipe cleaners ended up on top so as not to hurt anyone's scalp. Done!

Lay out your leaves and petals. Decide how you want them to look on the shirt.

 This is the pattern I decided on: five leaves each for the front and the back.
Next, pin the leaves in the pattern that you have chosen. I pinned along the top and the bottom just to hold them in place. Sew a horizontal line across each leaf at the top.


Then sew a vertical line, starting at the top, down to the center of each leaf. DO NOT sew the front and back of the shirt together. Be slow and careful.

After the leaves are sewn on, put the petals on top of the leaves in your chosen pattern, pin and sew in place. I used a zig-zag stitch here because it is on the neck line and needs to be stretchy to fit over the head.
 And the final product:
  I added to the sleeves for a rose bud affect. It was a bit tricky and I did not add that to the directions. I also bought a short sleeved shirt and had to add the long part of the sleeve. I used this tutorial for the sleeves so didn't think I needed to make that part of this post.
Authors note (added 10/25/10): the headband was a bit too heavy for my tiny seven year old niece, so I took off two petals, one from each end and that worked out great for her!
Note: DO NOT COPY this tutorial without permission.
Your son looks so cute! Love the costume. My daughter would love to wear that around!
ReplyDeleteWhat a wonderful costume! Your niece is so lucky because this costume is so much better than those awful, cheap store bought ones! That was awfully sweet of your son to model it too! Great job.
ReplyDelete